How to: Use Google Cloud Tasks to manage Airtable rate limits
In this tutorial, we continue building an integration between Shopify and Airtable and focus on managing Airtable’s API rate limits using a Google Cloud Task queue. In part 1, we set up a Shopify connection in Gadget and set up a client to forward product data to Airtable.
The challenge with API rate limits
When integrating Shopify with Airtable, you may encounter rate limit discrepancies between the two platforms. Shopify and Airtable each have their own rate limits for API requests, and if not managed properly, this can lead to synchronization issues.
Airtable has a rate limit of 5 requests per second. Shopify also has API rate limits that vary based on the API and whether or not the merchant is part of the Shopify Plus program. Although Gadget manages Shopify’s rate limits when syncing historical data, we still need a way to handle Airtable’s rate limit. Forwarding data from Shopify directly to Airtable could exceed Airtable’s API rate limits, especially for Shopify Plus merchants, and exceeding Airtable’s limit results in a 429 response code and prevents you from making additional requests for 30 seconds. We definitely want to avoid a 30-second timeout.
That said, we don’t want to write a whole bunch of custom logic to manage Airtable’s rate limit and retry logic. Instead, Google Cloud Tasks can be used to set up a queue that will not exceed Airtable’s rate limit, ensuring that all our Shopify data is successfully stored in Airtable.
Introducing Google Cloud Tasks
Google Cloud Tasks is a powerful tool that can help you manage the rate limit discrepancy between Shopify and Airtable. With Google Cloud Tasks, you can create a queue for tasks and control the flow of data between different services, ensuring that Airtable can handle the data being sent its way without issues.
Let's dive into the steps required to set up Google Cloud Tasks for your Shopify and Airtable integration.
Reminder: You should complete part 1 of this tutorial before taking the next steps.
Step 1: Create a Google Cloud project
- Head to the Google Cloud Console by visiting console.cloud.google.com
- Create a new project, and give your project a name
- Choose your organization and location. Note that you may need to create your own organization if you haven't done so already
Google Cloud Tasks offers a generous free tier, allowing you to get started without incurring any initial costs.
Step 2: Enable the Cloud Tasks API and create a queue
Now you need to enable the Cloud Tasks API on your project.
- Navigate to the Cloud Tasks API page
- Click ENABLE
- You may need to enter billing information at this point if you haven’t done so already
- Now head over to the Cloud Tasks management page
- Click CREATE PUSH QUEUE to create a new queue
- Give your queue a name and select a region
- Expand SHOW ADVANCED SETTINGS to view the Rate limits for task dispatches
- Change Max dispatches to 5 per second

- Click CREATE to finish creating the queue
This limits the events emitted by the queue to match Airtable’s API rate limit of 5 requests per second. By queueing Shopify data events as tasks in the queue, you ensure that you never exceed the Airtable rate limit.
Step 3: Set up a service account
You'll need to create a service account for your Gadget application to interact with Google Cloud Tasks. This service account will handle authentication and task creation.
- Navigate to the Service Accounts page in the Cloud Console
- Select your Google Cloud project, if not already selected
- Click + CREATE SERVICE ACCOUNT
- Give your service account a name and enter a description
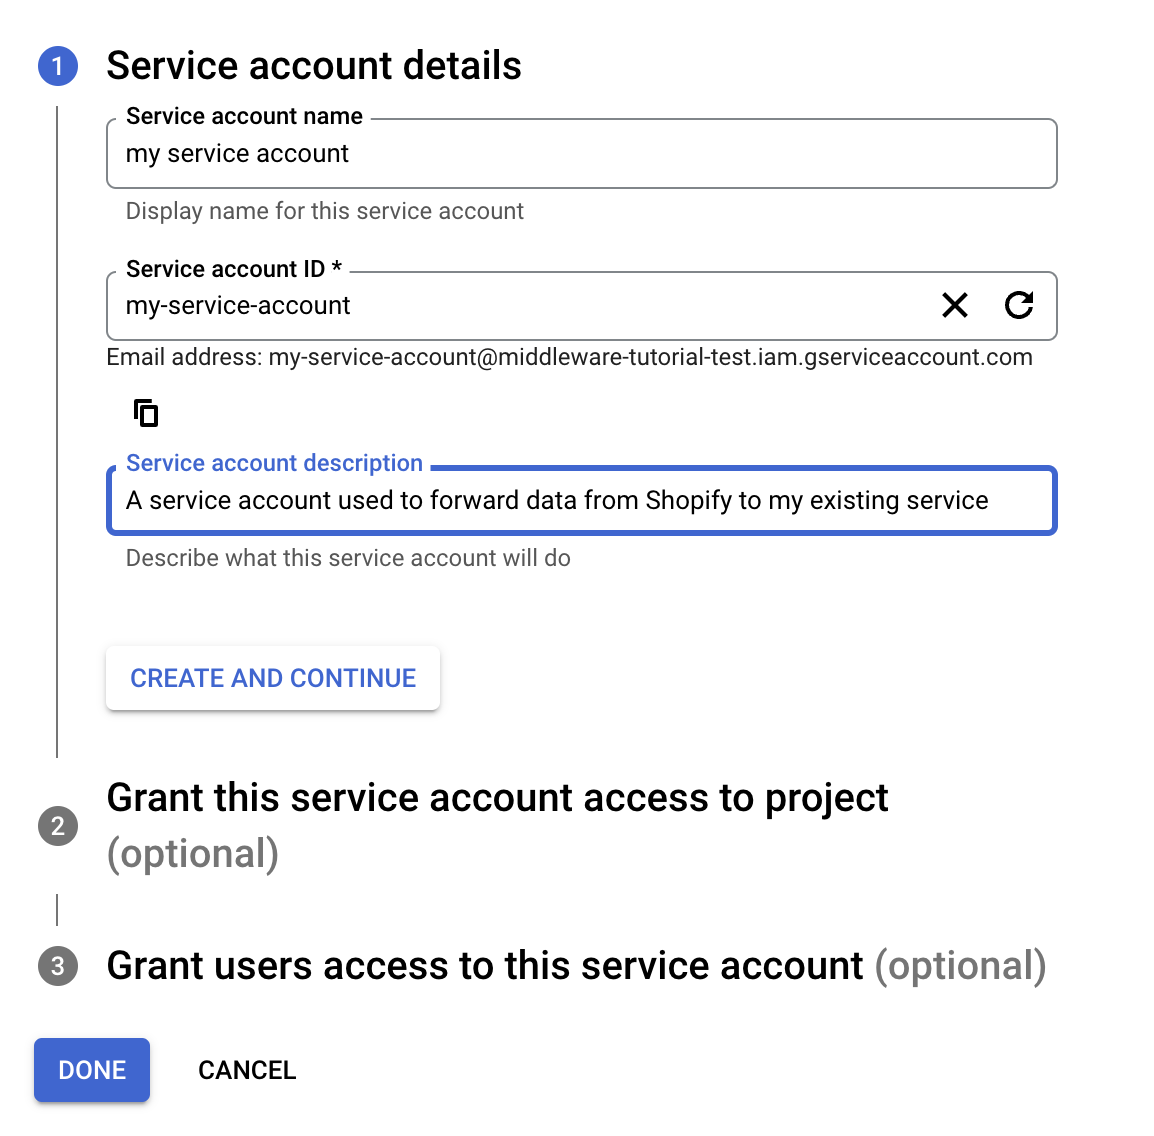
- Click CREATE AND CONTINUE
- Grant your service account the Cloud Tasks Enquerer and Service Account User roles

- Click Continue to save the roles to the service account
- Click Done to finish service account creation
The service account should be created. You will also need to generate a private key for this account to use in Gadget as an environment variable.
- Open the menu for your created service account by clicking on the three dots at the right of the service accounts table (...) and select Manage keys
- Click ADD KEY → Create new key
- Select the JSON option
This will download a JSON file to your local machine. This file contains a private_key field that will be used in Gadget.
Your Cloud Tasks project is now ready to queue up requests. You can make changes to your Gadget project to start using the queue.
Step 4: Configure environment variables in Gadget
To take advantage of both the Google Cloud Tasks queue and your Airtable client that was set up in Gadget, you will create a new HTTP route in your Gadget app. Your Cloud Tasks queue will call this route, which will make use of your Airtable client to forward Shopify data to Airtable.
- Add a new HTTP route to your Gadget app by adding a new file: <inline-code>routes/POST-airtable-create.js<inline-code>
- Add the following code to the route:
This will just log any incoming requests. You can use it to make sure your Cloud Tasks queue is set up properly.
Configure the necessary environment variables for Google Cloud Tasks integration in your Gadget application. These variables include:
- <inline-code>GCLOUD_SERVICE_ACCOUNT_PRIVATE_KEY<inline-code>: add the private key generated from the service account - you can encrypt this variable by clicking on the lock icon
- <inline-code>GCLOUD_SERVICE_ACCOUNT_EMAIL<inline-code>: add the email of your service account - this is available on the Details page for the service account user in Google Cloud Console
- <inline-code>GCLOUD_PROJECT_ID<inline-code>: add the project ID of your Google Cloud project
- <inline-code>GCLOUD_QUEUE<inline-code>: add the queue name of your Cloud Tasks queue
- <inline-code>GCLOUD_LOCATION<inline-code>: add the location of your Cloud Tasks queue
- <inline-code>TARGET_SERVICE_URL<inline-code>: add the URL of the service to which you want to forward data
The target service URL is where you want the data to be forwarded. In this setup, it's your Gadget application's route, which will then forward data to Airtable. This <inline-code>TARGET_SERVICE_URL<inline-code> should look like the following:
Now you can modify your existing app to integrate Google Cloud Tasks.
Step 5: Implement the integration in Gadget
You'll need to modify your Gadget application to work with Google Cloud Tasks. First, you need to install the Cloud Tasks client:
- Open the Gadget command palette (click the search bar at the top of the Gadget editor)
- Type <inline-code>><inline-code> to enter command mode
- Type <inline-code>yarn add @google-cloud/tasks<inline-code> and press enter to install
The client will be installed in your Gadget app. Now you can modify the <inline-code>shopifyProduct<inline-code> <inline-code>create<inline-code> action to push tasks to the queue instead of forwarding data directly to Airtable.
- Paste the following code in <inline-code>shopifyProduct/actions/create.js<inline-code>
This code file sets up the CloudTasksClient and uses it to create a new task with your product data object as the payload. It makes use of the environment variables set up earlier, notably the <inline-code>TARGET_SERVICE_URL<inline-code>, to queue up the data and forward it to your HTTP route, which should write the request payload to your Gadget logs.
Test this out. You can create a new product in your Shopify dev store admin. There is a 10-second delay built into this sample code. This gives you enough time to view your task in the Cloud Tasks queue, if desired. Once the queue has pushed the request, you should see an entry in your Gadget Logs so you know the HTTP route is being called successfully.
Once you see the log message, you can use your Airtable client in the HTTP route to forward data to Airtable.
- Paste the following code in <inline-code>routes/POST-airtable-create.js<inline-code>
This code imports your existing Airtable client from Part 1 of this tutorial and uses it to forward product data to Airtable when you create a new Shopify product.
Test it out
Now you can test out the complete app. Create another product in the Shopify development store admin and, after being queued up by Cloud Tasks, you will see your data appear in Airtable.
Congrats! You have successfully built an app that handles Airtable’s rate limits when forwarding data from Shopify. It‘s now possible to run a historical data sync on your Shopify products so that all existing products are synced to Airtable.
Next steps
You may want to handle more than just the <inline-code>shopifyProduct<inline-code> <inline-code>create<inline-code> action using Cloud Tasks. To do this, you could either add a unique route for each webhook or action you want to cover or add an additional field to the object sent to Cloud Tasks that contains information about the action. This means that you could use a single HTTP route to handle incoming data for all of my product actions.
Conclusion
Integrating Shopify with Airtable can provide a powerful solution for managing your ecommerce business's data. However, ensuring that data synchronization works seamlessly is essential. By incorporating Google Cloud Tasks into your integration, you can effectively manage rate limits and guarantee that your data moves between platforms without a hitch. This results in a more efficient and reliable integration for your online store.
Stay tuned for Part 3 of this tutorial where changes are synced from Airtable back to Shopify.


